Custom Permission (SPPermissions)


- language: Swift and SwiftUI
- platform: ios and tvos
- device: iphone
- license: MIT
Tag
Download
Supported Permissions
Installation
Ready to use on iOS 11+. Supports iOS, tvOS, and SwiftUI.
Swift Package Manager
dependencies: [
    .package(url: "https://github.com/ivanvorobei/SPPermissions", .upToNextMajor(from: "7.1.0"))
]
Next choose the permissions you need. But don't add all of them, because apple will reject app.
CocoaPods:
pod 'SPPermissions/Notification'pod 'SPPermissions/Camera'
pod 'SPPermissions/LocationAlways'
pod 'SPPermissions/Microphone'
Imports
import SPPermissions
import SPPermissionsCamera
import SPPermissionsPhotoLibraryimport SPPermissionsQuick Start
// MARK: 1. Choose the permissions you need:

let permissions: [SPPermissions.Permission] = [.camera, .notification]

// MARK: 2. Choose present style:

// 2a. List Style
let controller = SPPermissions.list(permissions)
controller.present(on: self)

// 2b. Dialog Style
let controller = SPPermissions.dialog(permissions)
controller.present(on: self)

// 2c. Native Style
let controller = SPPermissions.native(permissions)
controller.present(on: self)

// MARK: 3. Optional: Check permission state (available `authorized`, `denied`, `notDetermined`):

let authorized = SPPermissions.Permission.calendar.authorized
Status
let authorized = SPPermissions.Permission.calendar.authorizedLocation
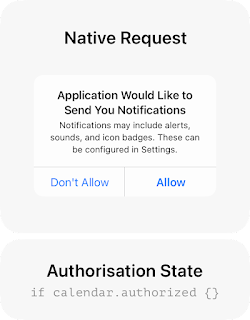
if SPPermissions.Permission.locationWhenInUse.isPrecise { ... }Request
List
It's native UITableViewController. Use it when you have more than two permissions. An example of how it is used:
let controller = SPPermissions.list([.calendar, .camera, .contacts])

// Ovveride texts in controller
controller.titleText = "Title Text"
controller.headerText = "Header Text"
controller.footerText = "Footer Text"

// Set `DataSource` or `Delegate` if need.
// By default using project texts and icons.
controller.dataSource = self
controller.delegate = self

// If you want auto dismiss controler,
// when all permissions has any determinated state
// set dismiss mode `allPermissionsDeterminated`.
// By default dismiss controller happen only when all permission allowed.
controller.dismissCondition = .allPermissionsDeterminated

// Always use this method for present
controller.present(on: self)
Dialog
This is a modal alert. I recommend using this alert style when you have less than three requested permissions. Usage example:
let controller = SPPermissions.dialog([.camera, .photoLibrary])

// Override texts in controller
controller.titleText = "Title Text"
controller.headerText = "Header Text"
controller.footerText = "Footer Text"

// Set `DataSource` or `Delegate` if need.
// By default using project texts and icons.
controller.dataSource = self
controller.delegate = self

// If you want auto dismiss controler,
// when all permissions has any determinated state
// set dismiss mode `allPermissionsDeterminated`.
// By default dismiss controller happen only when all permission allowed.
controller.dismissCondition = .allPermissionsDeterminated

// Always use this method for present
controller.present(on: self)
Native
let controller = SPPermissions.native([.calendar, .camera, .contacts])

// Set `Delegate` if need.
controller.delegate = self

// Always use this method for request.
controller.present(on: self)
DataSource
extension Controller: SPPermissionsDataSource {

    func configure(_ cell: SPPermissionsTableViewCell, for permission: SPPermissions.Permission) {

        // Here you can customise cell, like texts or colors.
        cell.permissionTitleLabel.text = "Title"
        cell.permissionDescriptionLabel.text = "Description"

        // If you need change icon, choose one of this:
        cell.permissionIconView.setPermissionType(.bluetooth)
        cell.permissionIconView.setCustomImage(UIImage.init(named: "custom-name"))
        cell.permissionIconView.setCustomView(YourView())
    }
}
Denied alert
If a permission is denied, you can provide an alert to the user with an option to open settings. An example of how you can customise the alert text:
let texts = SPPermissionsDeniedAlertTexts()
texts.titleText = "Permission denied"
texts.descriptionText = "Please, go to Settings and allow permission."
texts.actionText = "Settings"
texts.cancelText = "Cancel"
Next implement the following method and return:
SPPermissions has ready-to-use localizations for:
Do not use the description as the name of the key.
If you use xliff localization export, keys will be create automatically. If you prefer do the localization file manually, you need to create InfoPlist.strings, select languages on the right side menu and add keys as keys in plist-file. See:
Apple changed its review guidelines in June 2021. When requesting permissions, apps should require users to always request and make a decision whether to allow or decline the permission. For this reason, the close button in SPPermissions is hidden by default. If you want to force show the close button, run the following code:
Also changed title for button. Instead of allow now using continue. The Apple Review Team asked for this. For details, check out this issue.
func deniedAlertTexts(for permission: SPPermissions.Permission) -> SPPermissionsDeniedAlertTexts? {

    // Custom texts:
    return texts

    // or default texts:
    // return .default
}
Delegate
To get hidden, allowed or denied events , set the delegate with protocol SPPermissionsDelegate:
extension Controller: SPPermissionsDelegate {

    func didHidePermissions(_ permissions: [SPPermissions.Permission]) {}
    func didAllowPermission(_ permission: SPPermissions.Permission) {}
    func didDeniedPermission(_ permission: SPPermissions.Permission) {}
}
Localizations
- English en
- Arabic ar
- German de
- Spanish es
- French fr
- Polish pl
- Portuguese pt
- Ukrainian uk
- Russian ru
- Chinese Simplified Han zh_Hans
- Italian it
- Chinese Traditional zh_Hant
Keys in Info.plist
You need to add some keys to the Info.plist file with descriptions, per Apple's requirement(s). You can get a plist of keys for permissions as follows:
let key = SPPermissions.Permission.bluetooth.usageDescriptionKeyList of keys:
- NSCameraUsageDescription
- NSContactsUsageDescription
- NSCalendarsUsageDescription
- NSMicrophoneUsageDescription
- NSAppleMusicUsageDescription
- NSRemindersUsageDescription
- NSPhotoLibraryUsageDescription
- NSPhotoLibraryAddUsageDescription
- NSSpeechRecognitionUsageDescription
- NSMotionUsageDescription
- NSLocationWhenInUseUsageDescription
- NSLocationAlwaysAndWhenInUseUsageDescription
- NSBluetoothAlwaysUsageDescription
- NSBluetoothPeripheralUsageDescription (iOS 12 and earlier)
- NSUserTrackingUsageDescription
- NSFaceIDUsageDescription
- NSSiriUsageDescription
- NSHealthUpdateUsageDescription
- NSHealthShareUsageDescription
Do not use the description as the name of the key.
If you use xliff localization export, keys will be create automatically. If you prefer do the localization file manually, you need to create InfoPlist.strings, select languages on the right side menu and add keys as keys in plist-file. See:
"NSCameraUsageDescription" = "Here description of usage camera";Apple Review
// Show & hide close button
controller.showCloseButton = true

// Enable or Disable drag intercation
controller.allowSwipeDismiss = true